Find in this Blog

Showing posts with label SAP. Show all posts

Thursday, January 12, 2023

Configuring SAP Java system SLD without Solution Manager.

Configuring SAP Java system SLD without Solution Manager.

Manual Configuration

Step: Login to Java system 

http://system.fqdn.local:50000/sld 


Click on Technical System , create new technical system 


Choose ASAABAP

Fill the ABAP system SID and installation number and host name ( Abap system license should be valid period)


ABAP system hostname , message server number ( goto SMMS tcode and check parameter for hostname) Next
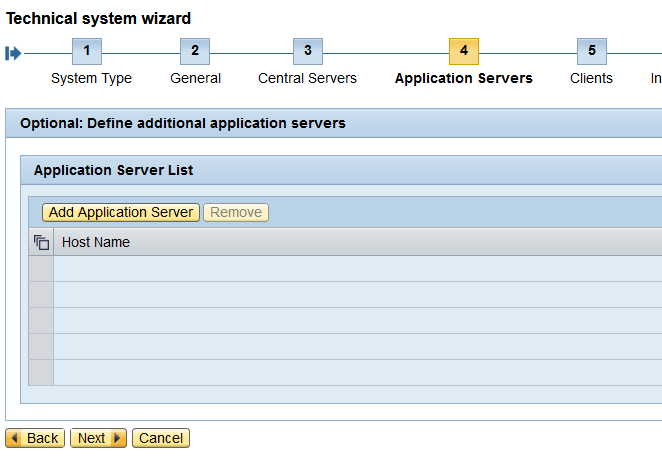

Next if you have additional application server mention here


Add client detail

add 000 Client and Business Client  and respective LOGICL SYSTEM NAME
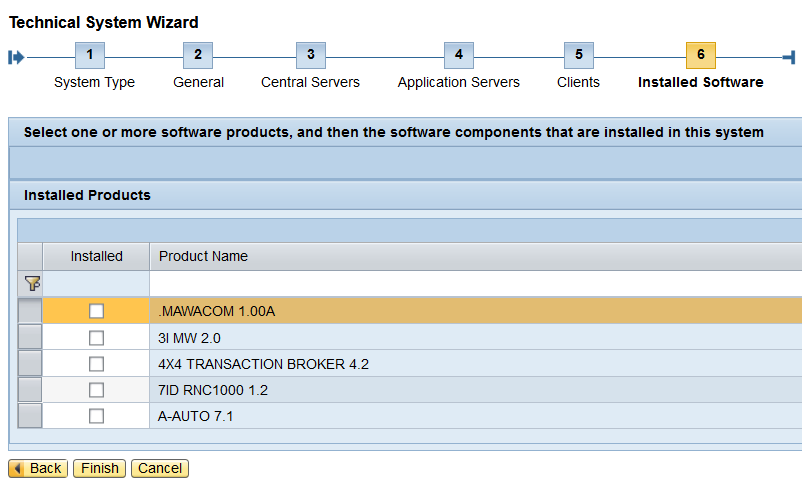
Choose the product of ABAP system ( S4HANA , NETWEVER 7.5, ECC6  etc)

Next> Finish.

Chose created Technical system and fill the following


General Tab

Make sure  System name

Installation Number

TMS Domain = DOMAIN_SID

TMS Group = GROUP_SID

Database Tab

Client Tab


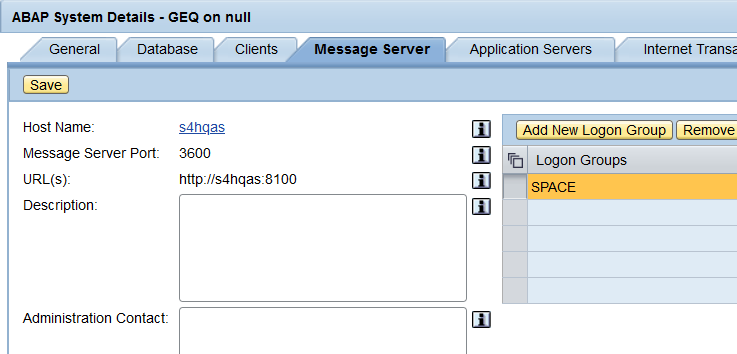
Message Server tab
=============================

Again go to Home and choose Business System 

Choose New Business system >> AS ABAP
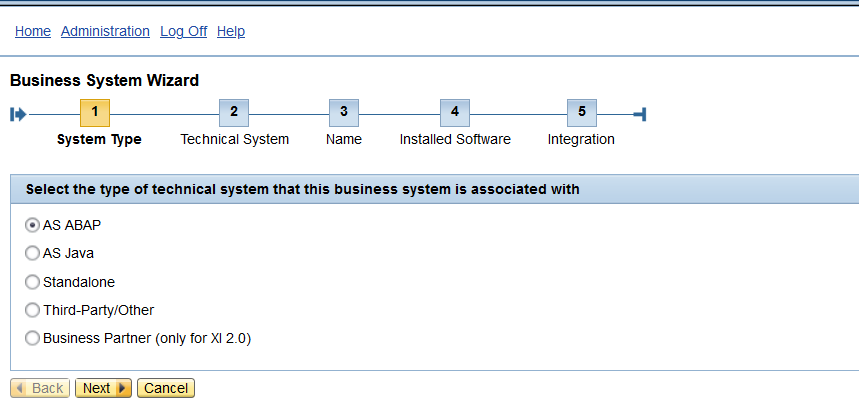
Choose Technical system previously created 

Eg: GEQ,Client=200
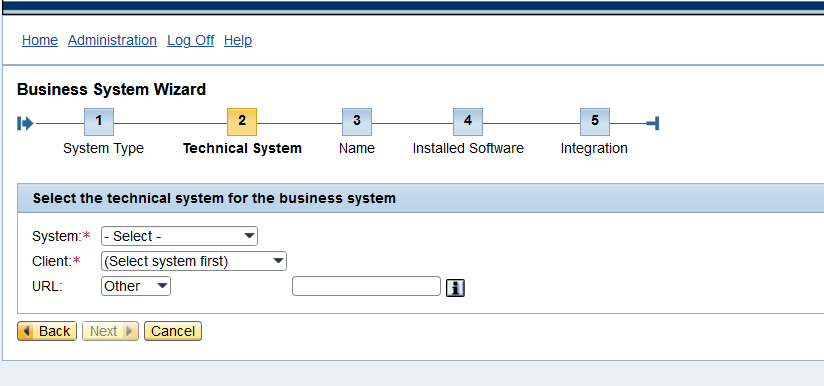
Enter Business System Name:  BS_GEQ_<client>

Next> Installed Software

Next Integrations, Choose Business system role= Application system

Related integration server = INTEGERATIO_ENGIN_JAVA

finish ===

Again Go Back Home Technical system check the Business system Tab, the integration is available 


login to ABAP system to verify the connection between JAVA & ABAP

  1. Go to Txn SM59 create RFC >> HTTP External connection required to create. Host: Java system IP/host and Port number and userid/password.
  2. Go to Txn SLDAPICUST 


Choose the connection and click test if  RFC is configured properly  will get below result.
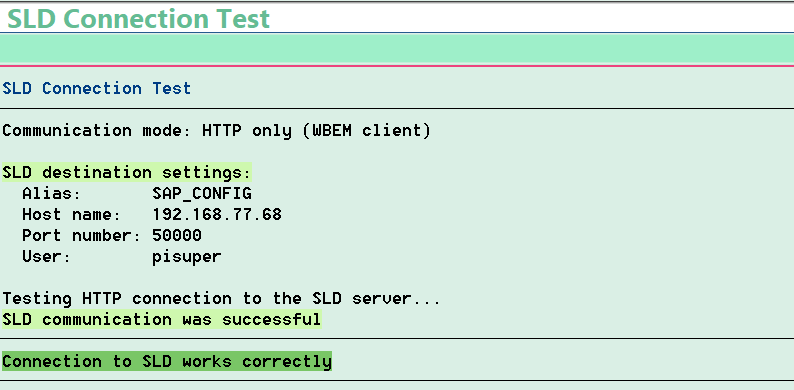

Go to Txn 
SLDCHECK to ensure working perfectly  this will redirect to java system Http


You have successfully created SLD 


Monday, October 23, 2017

sapgui 7.40/ 7.50: How can I migrate saplogon.ini to new SAPUILandscape.xml file?

How can I migrate saplogon.ini to new SAPUILandscape.xml file?

Ans: Rename the existing  SAPUILandscape.xml  and restart the SAPLOGN then it will create new SAPUILandscape.xml  from your saplogon.ini file.
thanks
Yoonus

Monday, August 31, 2015

Configure retention period for Automatic Workload Repository


Symptom

Automatic Workload Repository (AWR):
This note describes how you configure the retention period and the snapshot interval for performance data in the Automatic Workload Repository (AWR) for an Oracle database.

By default, the system retains AWR performance data in the AWR repository for a period of 7 days. For important SAP systems, we recommend that you set an AWR retention period of at least 42 days (6 weeks). This kind of retention period enables you to analyze performance problems by comparing the performance between monthly closings based on the AWR performance data.

For more information about AWR, see SAP Notes
853576, 974781, 1028068, 828268, and 1149771.


Other Terms

AWR, Automatic Workload Repository
DBA_HIST_WR_CONTROL


Reason and Prerequisites

Prerequisites for using the AWR

  • Oracle Database Release 10.2 or higher
  • Sufficient free space for the AWR repository in the SYSAUX tablespace


Solution

Configuration of the AWR retention period

  1. Determine the AWR retention period that is currently set.

    To do this, use the following SQL command:
    SQL> select retention from dba_hist_wr_control;
  2. Define the new AWR retention period.
    Oracle default setting: 7 days
    Recommendation for SAP: At least 42 days
  3. Check whether you have to extend the SYSAUX tablespace
    Determine how much freespace is available in the SYSAUX tablespace, how much space is required due to the longer retention period for the AWR, and whether the tablespace must therefore be extended. SAP Note 872851 describes how much space is occupied by which component in the SYSAUX tablespace.

    If you increase the AWR retention period from 7 to 42 days, you should calculate a sixfold requirement for the AWR repository. To calculate whether the free space is sufficient for the higher retention period, you can use the following SQL queries:

    The space currently filled by the AWR in the SYSAUX tablespace:
    SQL> select SPACE_USAGE_KBYTES/1024 "AWR Size [MBytes]"  from V$SYSAUX_OCCUPANTS where occupant_name = 'SM/AWR';

    Total space still free in the SYSAUX tablespace:
    SQL> select sum(bytes)/(1024 * 1024) "SYSAUX MBytes free"  from dba_free_space where tablespace_name = 'SYSAUX';

    Total space used in SYSAUX:
    SQL> select sum (space_usage_kbytes) from v$SYSAUX_OCCUPANTS; 
  4. Set the desired AWR retention period

    The corresponding SQL commands are (this example assumes 6 weeks = 42 days (NUM_DAYS)):
    OS> sqlplus / as sysdba
    SQL> DEFINE NUM_DAYS = 42
    SQL> select retention from dba_hist_wr_control;
    SQL> begin dbms_workload_repository.modify_snapshot_settings ( retention => 60*24* &NUM_DAYS); end;
    SQL> /
    SQL> select retention from dba_hist_wr_control;
    SQL> UNDEFINE NUM_DAYS
    SQL> exit
Configuration of the AWR snapshot interval
The default setting for the AWR snapshot interval is 60 minutes, which is sufficient in most cases. You can make the relevant settings using the following command:

SQL> SELECT SNAP_INTERVAL FROM DBA_HIST_WR_CONTROL;
SQL> BEGIN DBMS_WORKLOAD_REPOSITORY.MODIFY_SNAPSHOT_SETTINGS (INTERVAL => 60); END;
SQL> /
SQL> SELECT SNAP_INTERVAL FROM DBA_HIST_WR_CONTROL;

If you require snapshots in shorter intervals for a more exact analysis of a specific situation, you can shorten this interval, for example, to 30 minutes:
SQL> DEFINE SNAP_INTERVAL=30
SQL> SELECT TO_CHAR(SYSDATE, 'YYYY-MONTH-DD HH24:MI:SS') FROM DUAL;
SQL> SELECT SNAP_INTERVAL "CURRENT SNAP_INTERVAL" FROM DBA_HIST_WR_CONTROL;
SQL> BEGIN DBMS_WORKLOAD_REPOSITORY.MODIFY_SNAPSHOT_SETTINGS ( INTERVAL =>  &&SNAP_INTERVAL); END;
SQL> /
SQL> SELECT SNAP_INTERVAL "NEW SNAP_INTERVAL" FROM DBA_HIST_WR_CONTROL;

In most cases, we recommend that you set the standard interval again when the short interval is no longer required.


===================================================


C:\Users\SAPADMIN> sqlplus / as sysdba
SQL*Plus: Release 10.2.0.5.0 - Production on Mon Aug 31 16:10:23 2015
Copyright (c) 1982, 2010, Oracle.  All Rights Reserved.

Connected to:
Oracle Database 10g Enterprise Edition Release 10.2.0.5.0 - 64bit Production
With the Partitioning, OLAP, Data Mining and Real Application Testing options
SQL> DEFINE NUM_DAYS = 42
SQL> select retention from dba_hist_wr_control;


RETENTION
---------------------------------------------------------------------------
+00007 00:00:00.0

SQL> begin dbms_workload_repository.modify_snapshot_settings ( retention => 60*24* &NUM_DAYS); end;
  2  /
old   1: begin dbms_workload_repository.modify_snapshot_settings ( retention => 60*24* &NUM_DAYS); end;
new   1: begin dbms_workload_repository.modify_snapshot_settings ( retention => 60*24* 42); end;

PL/SQL procedure successfully completed.
SQL> select retention from dba_hist_wr_control;
RETENTION
---------------------------------------------------------------------------
+00042 00:00:00.0

SQL> UNDEFINE NUM_DAYS
SQL> exit
Disconnected from Oracle Database 10g Enterprise Edition Release 10.2.0.5.0 - 64bit Production
With the Partitioning, OLAP, Data Mining and Real Application Testing options


Thursday, July 2, 2015

What is the procedure to disable import all option from STMS in SAP?

To disable import all option from STMS in SAP, steps are:
 
a) Go to STMS T-code
b) Go to menu option overview
c)  Select System
d) Choose SAP System
e) Go to transport tool tab
f)  Create parameter “No_Import_All” with value set as 1
g) Save it
 
Thanks
Yoonus

Tuesday, June 23, 2015

Create SAP Router Certificate 23-Jun-2015

Creating the certificate request

  1. As user <snc_adm> set the environment variables SNC_LIB and SECUDIR:
    UNIX
    SECUDIR = <directory_of_SAProuter>
    SNC_LIB = <path_to_libsecude>/<name_of_sapcrypto_library>
    Windows NT, 2000, XP or higher
    SECUDIR = <directory_of_SAProuter>
    SNC_LIB = <drive>:\<path_to_libsecude>\ntia64\sapcrypto.dll or
    SNC_LIB = <drive>:\<path_to_libsecude>\ntintel\sapcrypto.dll or
    SNC_LIB = <drive>:\<path_to_libsecude>\nt-x86_64\sapcrypto.dll
    NoteAfter configuring the variables in Windows, you have to reboot this server before you continue.
  2. Change to http://service.sap.com/saprouter-sncadd. From the list of SAProuters registered to your installation, choose the relevant "Distinguished Name".
  3. Generate the certificate Request with the command:
    sapgenpse get_pse -v -r certreq -p local.pse "<Distinguished Name>"
    Example:
    sapgenpse get_pse -v -r certreq -p local.pse "CN=example, OU=0000123456, OU=SAProuter, O=SAP, C=DE"
    Alternatively use the two commands:
    sapgenpse get_pse -v -noreq -p local.pse "<Distinguished Name>"
    sapgenpse get_pse -v -onlyreq -r certreq -p local.pse
    You will be asked twice for a PIN here. Please choose a PIN and document it, you have to enter it identically both times. Then you will have to enter the same PIN every time you want to use this PSE.
  4. Display the output file "certreq" and with copy & paste (including the BEGIN and END statement) insert the certificate request into the text area of the same form on the SAP Service Marketplace from which you copied the Distinguished Name.
  5. In response you will receive the certificate signed by the CA in the Service Marketplace. Copy & paste the text to a new local file named "srcert", which must be created in the same directory as the sapgenpse executable.
  6. With this in turn you can install the certificate in your SAProuter by calling:
    sapgenpse import_own_cert -c srcert -p local.pse
  7. Now you will have to create the credentials for the SAProuter with the same program (if you omit -O <user_for_SAProuter>, the credentials are created for the logged in user account).
    sapgenpse seclogin -p local.pse -O <user_for _SAProuter>
    Note: The account of the service user should always be entered in full <domainname>\<username>
  8. This will create a file called "cred_v2" in the same directory as "local.pse"
    For increased security please check that the file can only be accessed by the user running the SAProuter.
    Do not allow any other access (not even from the same group)!
    On UNIX this will mean permissions being set to 600 or even 400!
    On Windows check that the permissions are granted only to the user the service is running as!
  9. Check if the certificate has been imported successfully with the following command:
    sapgenpse get_my_name -v -n Issuer
    The name of the Issuer should be:
    CN=SAProuter CA, OU=SAProuter, O=SAP, C=DE
  10. If this is not the case, delete the files "cred_v2"and "local.pse" and start over at item 3. If the output still does not match please open a customer message at component XX-SER-NET stating the actions you have taken so far and the output of the commands 3.,6.,7. and 9.
 
 
========================================
 
Please do the following:
- Follow the steps in SAP Note 2131531 - New Root Certification
Authority for saprouter certificates
- Download the latest SAP Crypto COMMONLIB 8 and SAProuter version as
720 as described under
https://support.sap.com/remote-support/help/installing-saprouter.html
-> Downloading necessary software components from SAP Support Portal
- On your SAProuter, delete your existing PSE file and old certificate
file (local.pse, cred_v2)
- Go to the
https://support.sap.com/remote-support/saprouter/saprouter-certificates.html
- Click on "Apply Now!"
- Follow the steps detailed in the documentation
https://support.sap.com/remote-support/help/installing-saprouter.html
-> Creating the certificate request
 
====================================================================================
 
 
c:\usr\sap\saprouter>sapgenpse get_pse -v -r certreq -p local.pse
Got absolute PSE path "C:\usr\sap\saprouter\local.pse".
Please enter PSE PIN/Passphrase: ****
Please reenter PSE PIN/Passphrase: ****
!!! WARNING: For security reasons it is recommended to use a PIN/passphrase
!!! WARNING: which is at least 8 characters long and contains characters in
!!! WARNING: upper and lower case, numbers and non-alphanumeric symbols.
get_pse: Distinguished name of PSE owner: CN=SAPROUTER, OU=000011111, OU=SAProu
ter, O=SAP, C=DE
 Supplied distinguished name: "CN=SAPROUTER, OU=000011111, OU=SAProuter, O=SAP,
 C=DE"
 Creating PSE with format v2 (default)
 succeeded.
 certificate creation... ok
 PSE update... ok
 PKRoot... ok
Generating certificate request... ok.


c:\usr\sap\saprouter>sapgenpse import_own_cert -c srcert -p local.pse
Please enter PSE PIN/Passphrase: ****
CA-Response successfully imported into PSE "C:\usr\sap\saprouter\local.pse"


c:\usr\sap\saprouter>

C:\usr\sap\saprouter>sapgenpse seclogin -p local.pse -O livenews
 running seclogin with USER="livenews"
 creating credentials for user "SAPROUTER\livenews" (yourself)...
Please enter PSE PIN/Passphrase: ****
 Adjusting credentials and PSE ACLs to include "SAPROUTER\livenews"...
 Oh, you supplied your own name explicitly ... ok.
   C:\usr\sap\saprouter\cred_v2  ... ok.
   C:\usr\sap\saprouter\local.pse  ... ok.
 Added SSO-credentials for PSE "C:\usr\sap\saprouter\local.pse"


C:\usr\sap\saprouter>sapgenpse get_my_name -v -n Issuer
 Opening PSE "C:\usr\sap\saprouter\local.pse"...
 PSE (v2) open ok.
 Retrieving my certificate... ok.
 Getting requested information... ok.
SSO for USER "livenews"
  with PSE file "C:\usr\sap\saprouter\local.pse"

Issuer     : CN=SAProuter CA, OU=SAProuter, O=SAP Trust Community II, C=DE
 

Thursday, June 18, 2015

HP DATA PROTECTOR SQL> SQL> SQL> ERROR: ORA-01031: insufficient privileges

hp DATA PROTECTOR INTEGRATION ERROR


BR0002I BRARCHIVE 7.10 (39)
BR0006I Start of offline redolog processing: aeqtjfza.sve 2015-06-18 10.44.38
BR0484I BRARCHIVE log file: G:\oracle\GPQ\saparch\aeqtjfza.sve
BR0280I BRARCHIVE time stamp: 2015-06-18 10.44.43
BR0301W SQL error -1017 at location BrDbConnect-2, SQL statement:
'CONNECT system/*********'
ORA-01017: invalid username/password; logon denied
BR0310W Connect to database instance GPQ failed

BR0101I Parameters
Name                           Value
oracle_sid                     GPQ
oracle_home                    D:\oracle\GPQ\11203
oracle_profile                 D:\oracle\GPQ\11203\database\initGPQ.ora
sapdata_home                   G:\oracle\GPQ
sap_profile                    D:\oracle\GPQ\11203\database\initGPQ.sap
backup_dev_type                util_file
system_info                    SYSTEM TEST-SERVERWindows 6.0 Build 6001 Service Pack 1 AMD64
oracle_info                    GPQ 11.2.0.3.0 8192 0 0    0
make_info                      NTAMD64 OCI_10201_SHARE May 17 2011
command_line                   D:\usr\sap\GPQ\SYS\exe\uc\NTAMD64\brarchive.exe -c -u system/*********
BR0280I BRARCHIVE time stamp: 2015-06-18 10.44.49
BR0301W SQL error -1017 at location BrDbConnect-2, SQL statement:
'CONNECT system/*********'
ORA-01017: invalid username/password; logon denied
BR0310W Connect to database instance GPQ failed
BR0278W Command output of 'D:\oracle\GPQ\11203\BIN\sqlplus /nolog < G:\oracle\GPQ\saparch\.aeqtjfza.spi':

SQL*Plus: Release 11.2.0.3.0 Production on Thu Jun 18 10:44:49 2015
Copyright (c) 1982, 2011, Oracle.  All rights reserved.
SQL> SQL> SQL> ERROR:
ORA-01031: insufficient privileges


SQL>
SQL> ORA-01012: not logged on
SQL>
BR0280I BRARCHIVE time stamp: 2015-06-18 10.44.49
BR0279W Return code from 'D:\oracle\GPQ\11203\BIN\sqlplus /nolog < G:\oracle\GPQ\saparch\.aeqtjfza.spi': 0
BR0302W SQLPLUS call for database instance GPQ failed
BR0323W 'Archive log list' for database instance GPQ failed

BR0545W Database reset logs ID not found
BR0013W No offline redolog files found for processing
BR0280I BRARCHIVE time stamp: 2015-06-18 10.44.59
BR0301W SQL error -1017 at location BrDbConnect-2, SQL statement:
'CONNECT system/*********'
ORA-01017: invalid username/password; logon denied
BR0310W Connect to database instance GPQ failed


BR0007I End of offline redolog processing: aeqtjfza.sve 2015-06-18 10.44.52
BR0280I BRARCHIVE time stamp: 2015-06-18 10.44.59
BR0004I BRARCHIVE completed successfully with warnings


Solution:
 
 Either re install or update the Client from Data protector.
 
[Normal]  Starting installation session on Thursday, June 18, 2015, 10:58:41 AM...
[Normal]  Getting list of clients for installation...
[Normal]  Done.
[Normal]  Expanding and checking clients to be installed...
[Normal]  Data Protector is already installed on the remote computer, updating it...
[Normal]  Starting installation on client test-server at Thursday, June 18, 2015, 10:58:41 AM...
[Normal] <test-server>   Reinstalling Core...
[Normal] <test-server>   Reinstall of Core succeeded.
[Normal] <test-server>   Reinstalling Core Technology Stack...
[Normal] <test-server>   Reinstall of Core Technology Stack succeeded.
[Normal] <test-server>   Reinstalling Integrations...
[Normal] <test-server>   Reinstall of Integrations succeeded.
[Normal] <test-server>   Reinstalling Automatic Disaster Recovery...
[Normal] <test-server>   Reinstall of Automatic Disaster Recovery succeeded.
[Normal] <test-server>   Reinstalling User Interface...
[Normal] <test-server>   Reinstall of User Interface succeeded.
[Normal] <test-server>   Reinstalling Disk Agent...
[Normal] <test-server>   Reinstall of Disk Agent succeeded.
[Normal] <test-server>   Reinstalling English Documentation (Guides, Help)...
[Normal] <test-server>   Reinstall of English Documentation (Guides, Help) succeeded.
[Normal] <test-server>   Reinstalling General Media Agent...
[Normal] <test-server>   Reinstall of General Media Agent succeeded.
[Normal] <test-server>   Reinstalling Manager-of-Managers User Interface...
[Normal] <test-server>   Reinstall of Manager-of-Managers User Interface succeeded.
[Normal] <test-server>   Reinstalling Oracle Integration...
[Normal] <test-server>   Reinstall of Oracle Integration succeeded.
[Normal] <test-server>   Reinstalling SAP R/3 Integration...
[Normal] <test-server>   Reinstall of SAP R/3 Integration succeeded.
[Normal]  Starting installation/update for client system test-server at TEST.TEST.local.
[Normal]  Update of client system test-server completed.
[Normal]  Installation session finished on Thursday, June 18, 2015, 11:06:20 AM.


============================================================================
                      Session completed successfully!
============================================================================

  1.  Check the backing.exe is existing in kernel directory
/usr/sap/sid/SYS/exe/NTAMD64/baclint.exe 
 
Check the system user status.
if its locked status unlock it.
 
SQL> alter user system account unlock;
User altered.
SQL> commit;
 
2. Check the sqlnet.ora file in both directory
 
 /usr/sap/sid/SYS/profile/oracle
%ORACLE_HOME%network/admin/
 
3. keep the same sqlnet file on both location as well as listener file also should be the same configuration.

4. Check the OS level permission for above files and the folders.
 
Thanks
Yoonus


Saturday, March 28, 2015

Register TP program

Register RFC program

rfcexec -aXXXXX_PORTAL_XXX -g XXXXXX -xsapgw00

-a = program name
-g = gateway host
 

Sunday, March 15, 2015

By Default $TMP Package

Solved Solution:::
 
Some time we faced this issue, All the newly created object Like DSO, Info Object, Info Cube etc. are by default are going to $TMP package.
Even we have already a "Z" package in SAB BI.
 
So if we Perform a small setting in BI RSA1 T code then we can solve this problem.
 
Go to RSA1 and click on BI Content Tab.


Now in BI Content tab go to tool Menu, Click on Edit > Transport > Switch off Standard Setting.


Know more about Switch On and Off Standard Setting.
 
Switch On Standard - If we use this option then after all the development  and changes a pop will come at a time to save development in a new request. 
 
Switch off Standard - If we use this setting then all the objects will by default save on the $TMP Local package. Then we need to collect all objects in Transport Connection > Click on Object type Folder then Collect required object and Give "Z" then transport.


Thanks,
 
Yoonus